Suunto Traverse Gabay sa User - 2.1
Mga Ruta
Maaari kang gumawa ng ruta sa Movescount, o mag-import ng rutang ginawa sa ibang serbisyo.
Para magdagdag ng ruta:
- Pumunta sa www.movescount.com at mag-log in.
- I-sync ang iyong Suunto Traverse sa Movescount gamit ang Suuntolink at ang ibinigay na USB cable.
Maaari ding i-delete ang mga ruta sa pamamagitan ng Movescount.
Navigating a route
You can navigate a route you have transferred to your Suunto Traverse from Movescount (see 3.20 Routes) or from a log in your logbook with GPS data. You get a preview of the route based on the route list or logbook selection.
If you are using the compass for the first time, you need to calibrate it (see Calibrating compass). After activating the compass, the watch will begin searching for a GPS signal. After the watch acquires a GPS signal, you can begin to navigate a route.
To navigate a route:
- Press to enter the start menu.
- Scroll to NAVIGATION with and press .
- Scroll to Routes or NAVIGATION and press to enter .
- Scroll to the route you want to navigate with or and press .
- Press to select Navigate. All navigating is recorded. If you watch has more than one sport mode, you are prompted to select one.
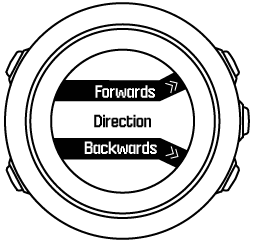
- Select Forwards or Backwards to chose the direction you want to navigate (from the first waypoint or the last).
- Start navigating. The watch informs you when you are approaching the beginning of the route.
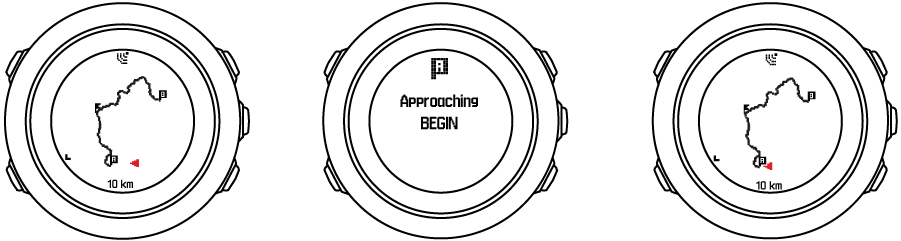
- The watch informs you when you have arrived at your destination.
You can also start navigating while recording an activity (see Recording activities).
Sa panahon ng pag-navigate
Sa panahon ng pag-navigate, pindutin ang upang i-scroll ang mga sumusunod na view:
- buong track view na ipinapakita ang buong ruta
- naka-zoom in na track view ng ruta: bilang default, ang naka-zoom in na view ay may sukat na 100 m (0.1 mi); mas malaki ang sukat kung malayo ka sa ruta
Track view
Ipinapakita sa iyo ng buong track view ang sumusunod na impormasyon:
- (1) arrow na tumutukoy sa iyong lokasyon at nakaturo sa direksyong pupuntahan mo.
- (2) ang simula at dulo ng ruta
- (3) Ipinapakita ang pinakamalapit na POI bilang isang icon.
- (4) sukat ng track view
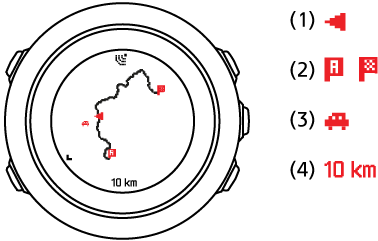
Sa buong track view, palaging nasa itaas ang hilaga.
Oryentasyon ng mapa
Maaari mong baguhin ang oryentasyon ng mapa sa menu ng mga opsyon sa ilalim ng NAVIGATION (PAG-NAVIGATE) » Settings (Mga Setting) » Map (Mapa) » Orientation (Oryentasyon).
- Heading up (Patungo sa itaas): Ipinapakita ang naka-zoom in na mapa nang nakaturo sa itaas ang patutunguhan.
- North up (Nasa itaas ang hilaga): Ipinapakita ang naka-zoom in na mapa nang nakaturo sa itaas ang hilaga.
View ng profile ng pag-akyat
Ipinapakita sa iyo ng view ng profile ng pag-akyat ang sumusunod na impormasyon:
- Natitirang pag-akyat
- Real-time na graph ng profile ng altitude
- Natitirang pagbaba
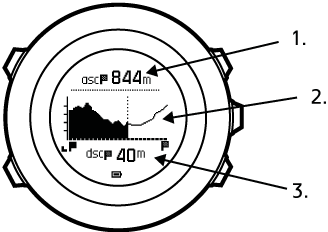
Kung masyado kang lalayo sa track ng ruta, hindi maa-update ang graph ng profile. Sa halip, ipinapakita ang text na Off route (Malayo sa ruta) sa ibaba ng graph. Kailangan mong bumalik sa track upang makakuha ng mga tumpak na pagkalkula ng pag-akyat.