From cycling to mountaineering, whatever your favorite outdoor sport, one thing we all have in common is the love and loathing of long, grueling ascents. They are immensely satisfying, give us a sense of achievement - and the incredible views that make it all worthwhile - and also smash us to pieces.
Suunto GPS watches come packed with intelligent features designed to help you on your long, arduous climbs. Read on for 10 features to support your vertical efforts.
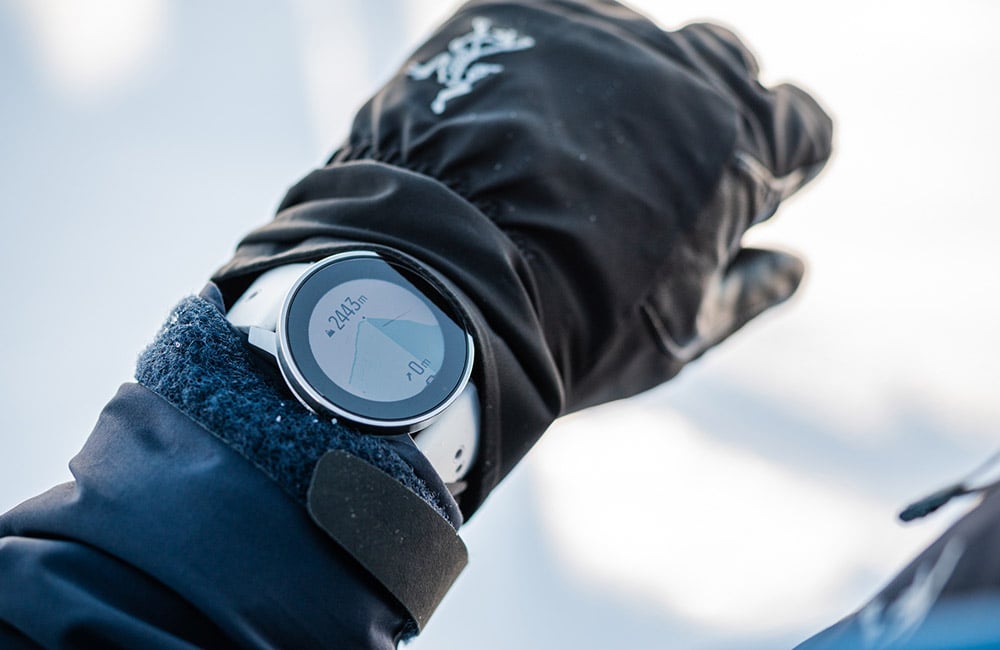
Know your altitude
Suunto Vertical, Suunto Race, Suunto 9 Peak Pro, Suunto 9 Peak and Suunto 9 Baro use barometric pressure to measure altitude. To get accurate readings, you need to define an altitude reference point. This can be your current elevation if you know the exact value. Set your reference point from the settings under ‘Outdoor’.
Alternatively, you can use FusedAlti to set your reference point automatically. The FusedAlti™ provides an altitude reading that is a combination of GPS and barometric altitude. It minimizes the effect of temporary and offset errors in the final altitude reading.
Suunto 5 Peak and other GPS watches that don’t have a barometer use GPS to measure altitude. Under optimal signal conditions, eliminating potential errors typical in calculating GPS position, the GPS altitude reading should give a pretty good indication of your elevation. If you need good elevation readings, ensure your GPS accuracy is set to Best during the recording.
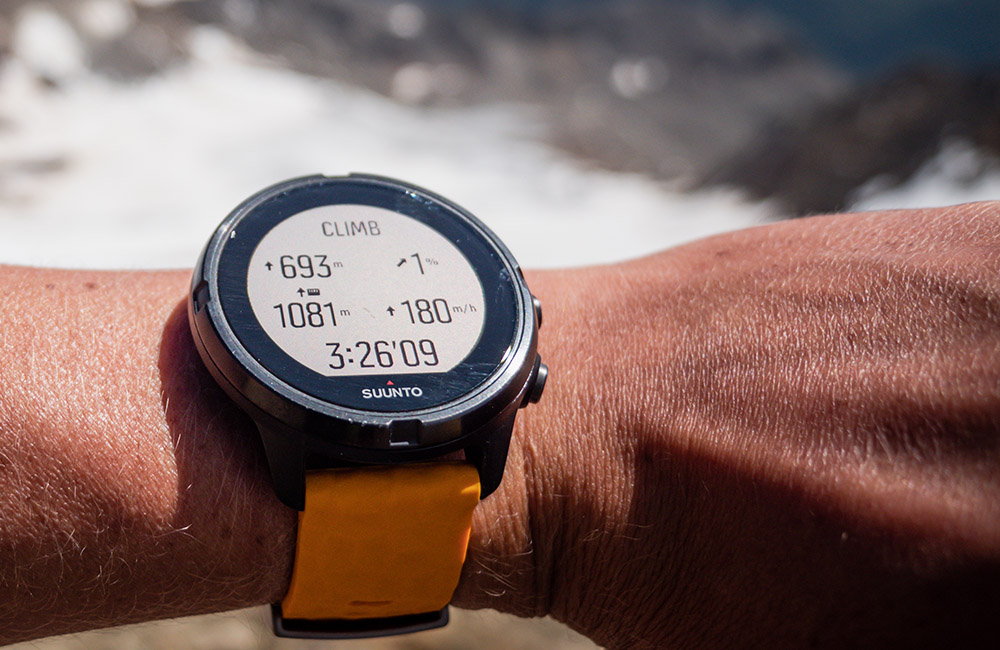
Follow your route’s altitude profile
If you are navigating a route that has altitude information, you can also navigate based on ascent and descent using the altitude profile display. While in the main navigation display (where you see your route), press the middle button to switch to the altitude profile display.
The altitude profile display shows you the following information:
top: your current altitude
center: altitude profile showing your current position
bottom: remaining ascent or descent
See your vertical speed
Vertical speed is a great way to measure your pace in the mountains. Set vertical speed as one of the data fields in your preferred sport mode in Suunto app. (Here’s how to customize your sport modes.)
Comparable to running pace on a flat surface, vertical speed takes into account only the altitude as a means of measurement. It’s a really useful performance indicator because it’s a direct measurement of how fast you’re going uphill.
Vertical speed is a great way to pace an effort in an uphill lap. This also helps you estimate how long the climb will take for you – if you know the total ascent. The vertical speed is shown as meters per minute or meters per hour (or alternatively ft/min or ft/hr).
Monitor your Normalized Graded Pace
The Normalized Graded Pace (NGP) feature calculates your pace based on GPS location information that takes into account the changes in grade and intensity. NGP really shines as a feature when applied to calculating your pace on undulating or hilly terrain. Like a cycling power meter, NGP tells runners or speed hikers how much power is going into their workout.
Boost your hill training with SuuntoPlus Climb
Hill repeats are an essential part of an outdoor athlete’s workout repertoire. To make the hard work pay off, pacing is key. SuuntoPlus™ Climb feature does just that: it gives you real-time insights on your effort and motivates you to keep going.
The same goes for longer hikes, too: once you learn what kind of ascent speeds are sustainable for you, you can use this feature to pace your way up accordingly.
To use SuuntoPlus™ features on the Suunto watch, activate them before starting an activity: Select your preferred activity type and – before hitting start – go down to the options menu and select your preferred SuuntoPlus feature, like Climb. The SuuntoPlus feature you chose, will be added and available as an extra screen during the session.
Watch your intensity zones
Achieving faster ascents takes dedication and patience. As sports scientist Susi Kraft explains here, the challenging thing about improving vertical speed is hill training usually maxes out our heart rate, reducing oxygen supply and taking us from aerobic to anaerobic exercise.
With Suunto’s intensity zones, you can monitor how hard you’re exerting yourself on a climb and when you should slow it down or even take a breather. There are five different zones, numbered 1 (lowest) to 5 (highest), defined by default as percentage ranges based on your maximum heart rate (max HR).
Learn how to define your personal heart rate zones here!
Your watch screen shows you which zone you are in as your exercise. Blue represents zone one, green is zone two, then yellow, orange and red, for zones three, four and five, respectively. When you stay in the first three zones, particularly zones one and two, you are doing aerobic exercise and training your base fitness. While in zones four and five you are moving into anaerobic exercise.
Before you set out on a big climb, consider the distance and likely duration of your planned exercise, including any return trip back down. Monitor your intensity zones on the climb and make sure you don’t overdo it too soon. Ensure you have enough fuel in the tank to get back down in good form.
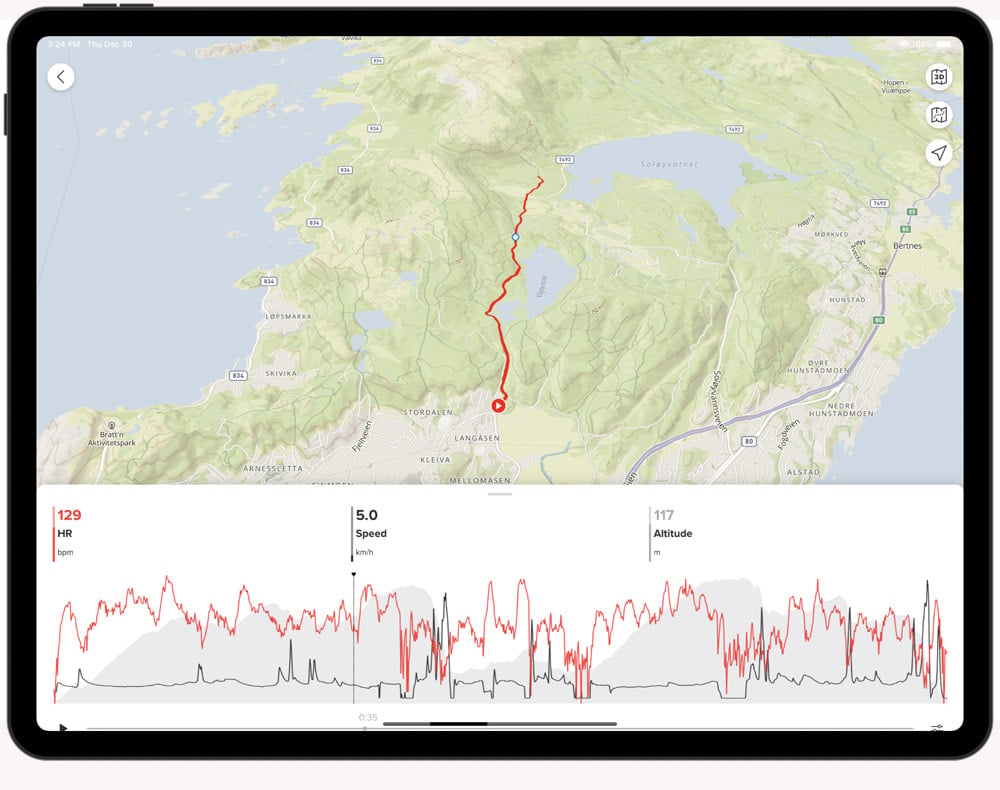
Review your elevation gain with Suunto app
To see a profile of the elevation you gained in a particular activity, open the activity in Suunto app and click on the map. A graph will appear that profiles the ascent and descent. You can then select your heart rate or pace, as examples, to layer over it.
To analyze your workouts on a bigger screen, give Suunto app a go on an iPad or an Android tablet.
Plan your route with 3D maps
To get a better sense of the sort of vertical challenge a route might be when you’re planning it Suunto app, switch from 2D maps to 3D maps. Zoom in and move around to get a lay of the land and to design a route with as much elevation gain as you can handle!
View and share 3D animations
With 3D video animations in Suunto app, you can watch an activity as a short animation that gives a better sense of the terrain. Proud of your effort? Then share a link to the activity with friends or family and they will be able to see the 3D animation as well – even on the big screen. To share an activity, tap the sharing icon and select ‘Share link to activity’. Add a description and photos to enhance the experience and to tell the full story.
Have a backup with SuuntoPlus Safe - My Location
If you’re heading out into alpine or mountainous terrain, safety is paramount. Weather in the mountains can change abruptly and a relatively minor injury at altitude can present a serious risk of exposure.In the event something goes wrong up there, the SuuntoPlus Safe - My Location feature provides crucial information to rescue teams. It provides location info and the direct distance and altitude from the starting place. Consider it a back up.
Images by Philipp Reiter


