Suunto Traverse Alpha User Guide - 2.1
Routes
You can create a route in Movescount, or import a route created with another service.
To add a route:
- Go to www.movescount.com and log in.
- Sync your Suunto Traverse Alpha with Movescount using Suuntolink and the supplied USB cable.
Routes could also be deleted through Movescount.
Navigating a route
You can navigate a route you have transferred to your Suunto Traverse Alpha from Movescount (see Routes) or from a log in your logbook with GPS data. You get a preview of the route based on the route list or logbook selection.
If you are using the compass for the first time, you need to calibrate it (see Calibrating compass). After activating the compass, the watch will begin searching for a GPS signal. After the watch acquires a GPS signal, you can begin to navigate a route.
To navigate a route:
- Press to enter the start menu.
- Scroll to NAVIGATION with and press .
- Scroll to Routes or NAVIGATION and press to enter .
- Scroll to the route you want to navigate with or and press .
- Press to select Navigate. All navigating is recorded. If you watch has more than one sport mode, you are prompted to select one.
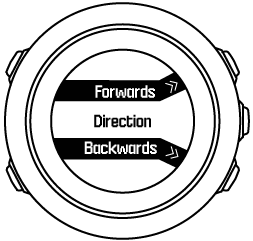
- Select Forwards or Backwards to chose the direction you want to navigate (from the first waypoint or the last).
- Start navigating. The watch informs you when you are approaching the beginning of the route.
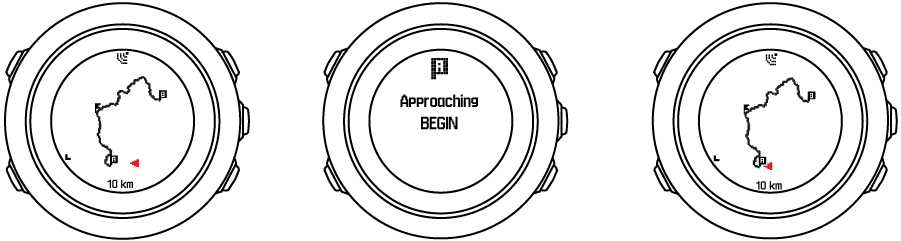
- The watch informs you when you have arrived at your destination.
You can also start navigating while recording an activity (see Recording activities).
During navigation
During navigation, press to scroll the following views:
- full track view showing the whole route
- zoomed-in track view of the route: by default, the zoomed-in view is scaled to a 100 m (0.1 mi) scale; the scale is larger if you are far away from the route
Track view
The full track view shows you the following information:
- (1) arrow indicating your location and pointing to the direction of your heading.
- (2) the beginning and end of the route
- (3) The closest POI is shown as an icon.
- (4) scale of the track view
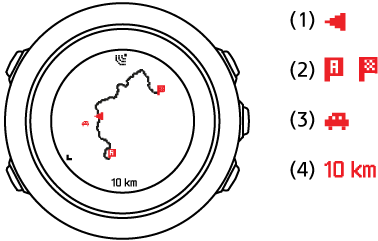
In the full track view the north is always up.
Map orientation
You can change the map orientation in the options menu under NAVIGATION » Settings » Map » Orientation.
- Heading up: Displays the zoomed-in map with the heading pointing up.
- North up: Displays the zoomed-in map with the north pointing up.
Ascent profile view
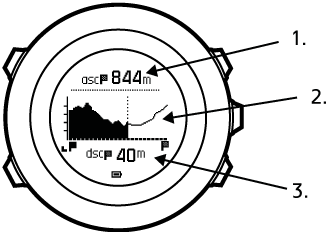
The ascent profile view shows you the following information:
- Remaining ascent
- Real-time altitude profile graph
- Remaining descent
If you veer too far off the route track, the profile graph is not updated. Instead, the text Off route is shown below the graph. You need to return to the track to get accurate ascent calculations.