Suunto Ambit3 Vertical User Guide - 1.2
PODs and HR sensors
Pair your Suunto Ambit3 Vertical with Bluetooth® Smart compatible bike, foot and Power PODs to receive additional information during exercise.You can pair up to five PODs at a time:
- three bike PODs, these can be speed, distance and/or cadence bike PODs, but only one can be connected at a time
- one foot POD
- one power POD
The Suunto Smart Sensor included in your Suunto Ambit3 Vertical package (optional) is already paired. Pairing is required only if you want to use a different Bluetooth Smart compatible heart rate sensor.
Pairing PODs and HR sensors
Pairing procedures may vary depending on the POD or heart rate (HR) sensor type. Please refer to the user guide for the device you are pairing with your Suunto Ambit3 Vertical before continuing.
To pair a POD or heart rate sensor:
- Activate the POD or heart rate sensor. If you are pairing a Suunto Smart Sensor, see Putting on Suunto Smart Sensor.
- Keep pressed to enter the options menu.
- Scroll to Pair with and select with .
- Scroll the options with and and press to select a POD or heart rate sensor to pair.
- Hold your Suunto Ambit3 Vertical close to the device you are pairing and wait for Suunto Ambit3 Verticalto notify that pairing was successful. If the pairing fails, press to retry, or to return to the pairing setting.

If you pair a power POD, you may need to define additional parameters in your Suunto Ambit3 Vertical. These include, but are not limited to:
- Left crank or Right crank
- Left pedal or Right pedal
- Rear dropout
- Chainstay
- Rear wheel or Rear hub
Using foot POD
When using a foot POD, the POD is auto calibrated by GPS at short intervals during exercise. However, the foot POD always remains the source of speed and distance when it is paired and active for the given sport mode.
Foot POD auto calibration is on by default. It can be turned off in the sport mode options menu under Activate, if the foot POD is paired and is used for the selected sport mode.
For more accurate speed and distance measurements, you can manually calibrate the foot POD. Perform the calibration on an accurately measured distance, for instance, on a 400 meter running track.
To calibrate foot POD with Suunto Ambit3 Vertical:
- Attach foot POD to your shoe. For more information, see user guide for the foot POD you are using.
- Choose a sport mode (for example Running) in the start menu.
- Start running at your usual pace. When you cross the starting line, press to start the recording.
- Run a distance of 800–1000 meters (about 0.500–0.700 miles) at your usual pace (for example two laps on a 400 meter track).
- Press when you reach the finish line to pause the recording.
- Press to stop recording. After stopping the exercise, save the log by pressing . If you do not want to save the log, press . Scroll with through summary views, until you reach the distance summary. Adjust the distance shown on the display to the actual distance you ran with and . Confirm with .
- Confirm the POD calibration by pressing . Your foot POD has now been calibrated.
If the foot POD connection was unstable during the calibration exercise, you might not be able to adjust the distance in the distance summary. Make sure that foot POD is attached properly according to instructions and try again.
If you are running without a foot POD, you can still get running cadence from the your wrist. Running cadence measured from wrist is used together with FusedSpeed (see FusedSpeed) and is always on for specific sport modes including running, trail running, treadmill, orienteering, and track and field.
If a foot POD is found at start of an exercise, running cadence measured from wrist is overwritten by foot POD cadence.
Calibrating power PODs and slope
Suunto Ambit3 Vertical automatically calibrates your power POD when it finds the POD. You can also calibrate the power POD manually at any time during an exercise.
To manually calibrate a power POD:
- While you are in a sport mode, keep pressed to access the options menu.
- Stop pedaling and lift your feet off the pedals.
- Scroll to Calibrate Power POD with and select with .
Suunto Ambit3 Vertical starts calibrating the POD and indicates if the calibration succeeded or failed. The bottom row of the display shows the current frequency used with the power POD. The previous frequency is shown in parentheses.

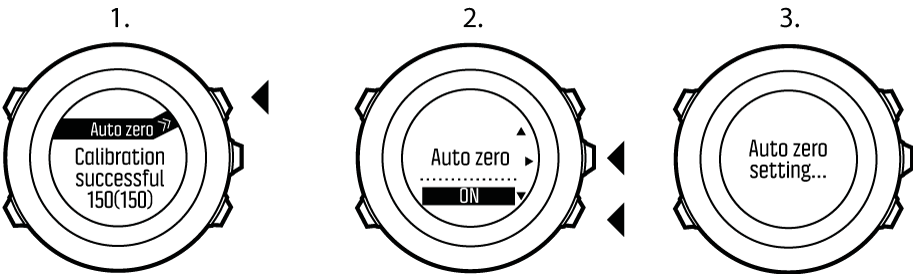
If your power POD has an auto zero feature, you can turn this on/off through your Suunto Ambit3 Vertical.
To set auto zero on/off:
- After the calibration is completed, press .
- Set auto zero On/Off with and accept with .
- Wait until the setting is completed.
- Repeat procedure if setting fails or power POD is lost.
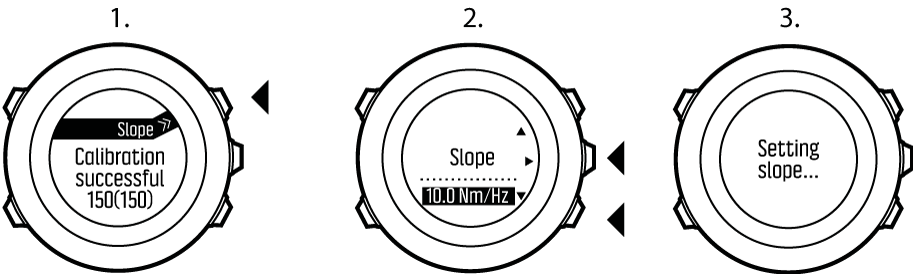
You can calibrate the slope for power PODs that use Crank Torque Frequency (CTF).
To calibrate the slope:
- After the power POD calibration is complete, press .
- Set the correct value according to your power POD manual with and accept with .
- Wait until the setting is completed.
- Repeat procedure if setting fails or power POD is lost.